- for SLR owners -
aperture
shutter speed
stop
exposure
metering
blur
depth of field
conclusion
top
The
aperture
When we step out of
the dark into the sunlight, we usually blink our eyes. Our pupils are
wide open in the dark and it takes a moment to adjust them to a small
aperture. In fact we react very fast to changing light conditions. So
fast in fact that most of the time we're not even aware of it.
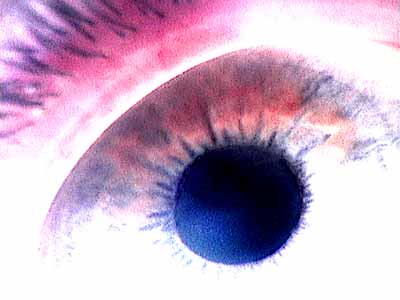
the pupil in the iris of my eye
In photography we
are continuously dealing with the amount of light that is avalaible to
us. And more specifically with the difference between the dark
and light areas of the scene we want to record. This difference we call
contrast.
In our eye we regulate
the the amount of light that reaches our retina with the pupil, the round
opening in the iris that gets larger or smaller. With a camera we have
two devices to regulate the amount of light. The aperture and the
shutter speed.
To expose our film correctly, there is a third factor: the film
speed.
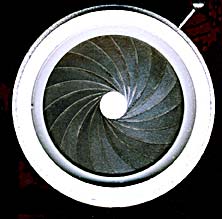
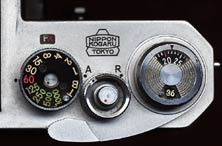
aperture
The aperture, or diaphragm, or lens opening is also a round opening we can make larger or smaller. This is done with thin metal leaves that shift over each other. It is located in the middle of the lens.
aperture control ring of a classic Nikon
With classic cameras we can see it opening and closing, when we look in the lens, while we turn the aperture ring. On these cameras we can set the aperture at certain fixed positions. The ring clicks in these settings as we turn it.
![]()
display with aperture and shutter speed
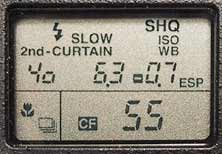
display of a digital camera
Modern cameras have data panels and touch dials. These controls are nice, clean and practical. Unfortunately the direct relation between control and function is lost. This makes it more difficult to master these functions.
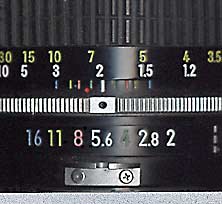
To each setting there is a corresponding number that indicates the opening. These numbers put next to each other form the aperture range. The first number is the largest aperture of that specific lens. The range goes as follows:

aperture range
1.4 - 2.0 - 2.8 - 4 - 5.6 - 8 - 11 - 16 - 22 - 32
We will not see all
of these numbers on the lens barrel or in the display. Sometimes there
will be intermediate settings. The widest aperture may well be a intermediate
setting, 3.5 for a zoom lens for example or 1.7 for a standard prime lens.
This is all very nice but not very important.
What is important, is:
1 - To know that these numbers form a logarithmic range, because they are derived from the area of a circle.
2 - Never to
forget that this area is doubled or halved with each next
setting. So opening the aperture one number from one lens opening to the
next one setting larger, the opening gets twice as wide and will
let through twice the amount of light. From one lens opening to
the next smaller lens opening the area is halved and thus the
amount of light passing through the opening is halved.
3 - A low aperture number is a large aperture. A
high number is a small aperture.
Confused? Not when
we speak and think of lens opening instead of diaphragm or aperture.
A large lens opening or a
small opening is immediately clear.
Top
The shutter
speed
With SLR's,
single lens reflexes, the aperture is located in the lens. The shutter
is located in the camera body, in front of the film. We can see it when
we take off the lens and look into the body, behind the mirror. -Please
do not ever touch the mirror-. We can also see it when we change film
and we open the camera back. With the film removed we look directly at
the rubber shutter curtains or the metal shutter leaves. -Please do not
ever touch these either-.
When we press the shutter release, the shutter curtains or leaves move
very quickly from right to left or from top to bottom. Between the two
curtains or the leaves, an opening or a slit is left open, through which
the light passes onto the film. The film sits directly behind the shutter.
The amount of time the light is let in, is variable. It can be very short: 1/2000 of a second for example. But it can also be rather long. As long as half a second: 1/2 s. That amount of time we call shutter speed. It indicates the amount of time the shutter is left open. The shutter speed numbers put in row form the shutter speed range. It looks like this:

shutter speed range
1/4000 - 1/2000 - 1/1000 - 1/500 - 1/250 - 1/125 - 1/60 - 1/30 - 1/15
- 1/8 - 1/4 - 1/2 - 1 - 2s - 4s - 8s
We have to learn this by heart too, to know what numbers we are looking at in our data display.
shutter speed dial on a classic Nikon F
Modern cameras with
electronic shutter speeds will display intermediate values like 1/90.
This is nice too, but again is not very important at this moment.
What is important is:
1 - To know that these numbers form a directly proportional range, derived from the shutter speed. Which has nothing to do with speed, but with the time our film is left exposed to light coming through the lens.
2 - This amount of time is halved or doubled from one step to the next. (Hey we heard that before.)
3 - A slower
shutter speed doubles the time. And twice the amount
of light will be let in.
A faster shutter speed will halve the time. And will let
in half the amount of light.
Top
A stop
The
step from one shutter speed to the other, faster or slower, is called
a stop. This goes for the aperture also: the step from one opening
to the other is called a stop.
The stop is the unit with which we work and by which count in photography.
Opening one stop means: we open the lens opening from e.g. f
8 to f 5.6. This f indicates the aperture. So we double
the amount of light passing through the lens.
One stop faster means: from e.g. 1/30 s to 1/60 s. The amount of time
the light is let through, is halved. One stop slower means from 1/30 s
to 1/15 s. The amount of time is doubled.
Sometimes for speed we use the letter t; so: t
1/30.
A stop always
means half or double the amount. Of time or
light.
Top
Exposure
The film that is in our camera must be exposed. This will
happen by a combination of shutter speed and aperture. This combination
depends on the amount of light which is available at that moment. And
on the speed of the film in our camera (fast or slow film). And it depends
on the choice we make out of all the posible combinations.
If we make a mistake, for example by letting too much light reach
our film, then the film gets overexposed. When too little light
reaches our film it is called underexposed.
Top
Metering
We measure light with a light meter. In almost all cameras it is integrated.
This meter should know which speed the film in the camera has, in order
to give the correct exposure. So we have to tell the meter the filmspeed.
Most modern cameras will do this for us, it will read the bar code on
the cassette: the DX-code. With older cameras we have to set the film
speed somewhere on the body.
Film speed is now
indicated by an ISO number (formerly: ASA or DIN). A slow speed is 50
ISO (sometimes the notation is: 50/18 ISO, the 18 comes from the older
DIN notation). We call this a slow film.
A fast speed is 800 ISO or higher, we call this a fast film. It is more
sensitive to light.
In black-and-white photography 100 ISO and 400 ISO are mostly used. In
color we also find 200 ISO quite often. With transparency or slide film
the speed is generally somewhat slower: 50 en 100 ISO.
We always meter the
light on our subject. So that means it is the most important part of the
image we are recording. If everything is equally important, then we have
to take care that the difference between the light parts and the dark
parts of the image (the contrast) is not too big. Because if the contrast
is too big, it will not fit on our film. The whites will be too white
and the darker parts will be too dark. This limitation of the material
is called contrast range. Or exposure latitude.The difference between
the lightest and darkest parts we can record on film as a rule can be
no more than 5 stops. With some material it is less.
We always must pay attention to bright objects within our frame. Like
a window, a light, or the sky. They will influence the metering severely.
The light meter will measure the whole frame and will not know at what
it is looking.
A meter basically expects an even distribution of black and white over
the whole image. We all know that this is not the case in reality. Modern
cameras with segment-metering will still not know at what we are pointing
our camera.
So if there are a lot of bright parts in our frame, but they are not our
subject, it is as if our camera is thinking: It is very bright here; my
aperture must be small and I must close my shutter fast. So to avoid that,
we have to take a reading very close to our subject. We have to point
our meter at our subject exclusively. Move in till the subject area fills
our frame exclusively.
Sometimes this is very impractical. Then we can also measure something
that is the average between white and black, in exactly the same light
as our subject. This is called a substitution reading. We use a
gray card for that. This is a card or a plastic board of an exact shade
of gray with a reflectance value right between white and black. Surprisingly
this average is not 50% gray but 18%. So this card is called the 18%
gray card. Metering using the gray card is the most exact way of determining
the exposure, because all meters are designed to calculate exposure for
subjects in reality of this tone.
Top
Blur
The
shutter speed not only determines the duration of the exposure, but it
also has an important impact on our image.
If we take a picture with a fast shutter speed, the image will seem frozen.
Even a speeding car. Which will look as if it is parked in the middle
of the road.
![]()
![]()
![]()
![]()
![]()
![]()
![]()
![]()
![]()
![]()
![]()
![]()
![]()
![]()
![]()
![]()
![]() fast
shutterspeed: everything is frozen
fast
shutterspeed: everything is frozen![]()
![]()
![]()
![]()
![]()
![]()
![]()
![]()
![]()
![]()
![]()
![]()
![]()
![]()
![]()
![]()
![]()
![]()
![]()
![]()
![]()
![]()
![]() slow speed: everything in the image is blurred.
slow speed: everything in the image is blurred.
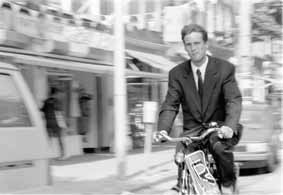
But if on the other hand we take a picture with a slow shutter speed,
everything in our image will be blurred. First of all it is very difficult
to hold our camera steady. And if something in the frame moves, it will
be blurred in the picture.
Top
Depth-of-field
Like the shutter speed which not only determines exposure but also the
appearance of our image, also the aperture has an important 'other' function.
The aperture determines how much in the frame is sharp in front of, and
behind, the point where we focused.
The zone where things are sharp (more accurately: sharp enough) in front
and behind our focusing point is called the depth of field.
The bigger the lens opening is, the more shallow the zone in front and
behind our point of focus is.
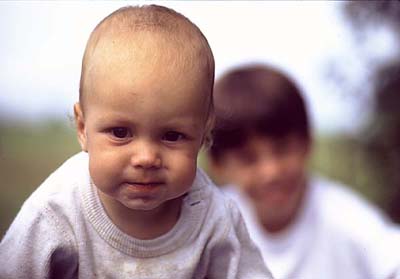
Shallow depth of field. With a large lens opening only the plane
where we focus is sharp:
foreground and background remain unsharp.

In a landscape or architecture we usually want a greater depth of
field: a small lens opening.
With a small opening the forground as well as the background are sufficiently
sharp.
This might be the single most important reason pictures do not turn out
as we expected them on the moment we took the photo. All of a sudden there
is a tree growing out of uncle Bill's head. Or antlers protrude out of
his ears. And when we took it we never saw all of this. Our frame was
so quiet: nothing distracted the view. When we pressed the shutter there
were no tree nor antlers in sight. The explanation: we focus at the largest
opening of our lens. The viewfinder is all serene. Only the focus point
is sharp. In front nothing, in the back nothing. But then the program
kicks in: it closes the aperture. Our camera takes over. It is thinking
for us. It determines opening and speed. And in this case with the antlers
there happens to be a lot of light so the aperture gets closed. And here
comes the tree or here come the antlers within the depth of field.
So use the P of program for Panic only.
In all other cases, do not let our cameras do the thinking.
Think for
yourself!
The
solution for a better image: think for yourself. Do not let your camera
decide how things will look in your picture.
If movement is the issue, - wether it has to move or stand still: choose your shutter speed first.
If sharpness
is the issue, - a greater depth of field in case of a landscape, or a
very shallow depth of field in case of a portrait in front of a very disturbing
background, choose your aperture first.
Top
Still
confused? Have a look at a page where I explain the
relation between aperture and shutter speed with a glass under a tap
- the old bucket and tap analogy.
Want more? Go to the links page to
online and offline lessons (now over 250 and counting)
Sorry, some of the comment on that page is in dutch at the moment.
It still is an enormous amount of knowledge you can find through these
links.
Im not a native speaker in english - you may have guessed ;-) -
so: if you have any remark on this article,
please sent me a mail